To give your space a quick, stylish makeover, peel-and-stick tiles are your best friend. They’re easy to install—just peel, align, and press onto a smooth surface—no mess or professional help needed. You can choose from various patterns and colors to match your decor. Since they’re removable, updating your look whenever you want is simple. Keep going to discover more tips and tricks to make your renovation a breeze.
Key Takeaways
- Choose a design that complements your space and measure accurately for a seamless look.
- Prepare the surface by cleaning and smoothing it for optimal tile adhesion.
- Peel, align, and press the tiles firmly, starting from a corner for easy installation.
- Trim tiles around outlets and edges with scissors or a utility knife for a polished finish.
- Easily remove and replace tiles to update your decor without damaging surfaces.
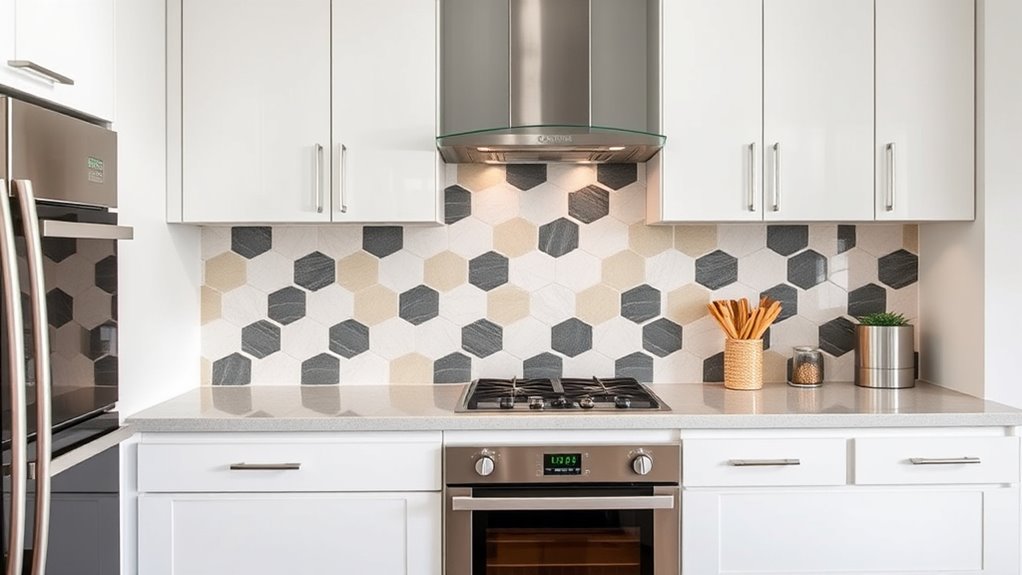
A quick and affordable way to transform your space is with peel-and-stick tiles. These tiles are designed for DIY installation, making it easy for you to update your home without the need for professional help or messy adhesives. You simply peel off the backing, align the tile, and press it into place. This straightforward process allows you to take on the project at your own pace, whether you’re a seasoned DIYer or a first-timer. Plus, peel-and-stick tiles come in a wide variety of tile design options, so you can customize your space to match your style and decor. From classic subway tiles to intricate mosaic patterns, the choices are endless, giving you the freedom to create a look that reflects your personality.
One of the biggest advantages of using peel-and-stick tiles is the ability to change your space quickly. You don’t need any special tools or extensive prep work, just a clean, dry surface. Before you start, make sure the area is smooth and free of dust or grease. Measure your space carefully and plan your layout to minimize cuts and ensure a balanced appearance. When applying the tiles, start from one corner and work your way out, pressing firmly to ensure good adhesion. If you encounter obstacles like outlets or corners, you can easily trim the tiles with scissors or a utility knife, making the installation process even more user-friendly. Additionally, understanding the cybersecurity vulnerabilities associated with digital tools can help you protect your smart home devices that might be connected to your renovated space.
Another benefit is that peel-and-stick tiles are removable, so if you decide to update your look later, you can peel them off without damaging your underlying surface. This makes them ideal for renters or for those who love to change up their decor frequently. Because they come in numerous tile design options, you can even mix and match patterns or colors to create a custom look tailored to your taste. Whether you’re aiming for a modern, rustic, or eclectic style, there’s a peel-and-stick tile that fits your vision.

Art3d 102-Piece Peel and Stick Wall Tile for Kitchen Backsplash, Bathroom, Fireplace, 3in. × 6in. Stick on Subway Tile, Glossy White
Easy DIY, Just Peel & stick, cut with tin snip, utility knives or hand saws, saving large amount…
As an affiliate, we earn on qualifying purchases.
As an affiliate, we earn on qualifying purchases.
Frequently Asked Questions
Are Peel-And-Stick Tiles Suitable for Outdoor Use?
Peel-and-stick tiles are generally not ideal for outdoor use because they lack the outdoor durability needed to withstand weather resistance. Exposure to rain, sun, and temperature fluctuations can cause them to peel or warp over time. If you want a long-lasting outdoor surface, consider tiles specifically designed for exterior applications, which offer better weather resistance and durability. Stick to products made for outdoor use to make certain your renovation holds up.
How Do I Remove Peel-And-Stick Tiles Without Damage?
Removing peel-and-stick tiles without damage is possible if you stay gentle and patient. Start by heating the edges with a hairdryer to loosen the adhesive, then gently lift the tiles using a plastic scraper or your fingers—avoid metal tools that could cause damage. Use removal techniques like applying adhesive remover if needed, but always test first. With care, you’ll preserve your surface and prevent damage, making removal smooth and stress-free.
Can These Tiles Be Used on Textured or Uneven Surfaces?
You can use peel-and-stick tiles on textured or uneven surfaces, but proper surface prep is vital. Clean the area thoroughly and smooth out major imperfections to improve adhesive strength. Keep in mind, rough or highly textured surfaces may reduce how well the tiles stick and could cause them to peel over time. For best results, choose tiles with strong adhesive qualities and consider applying a primer or bonding agent to enhance adhesion.
What Is the Lifespan of Peel-And-Stick Tiles?
Sure, these tiles magically last forever—just kidding! In reality, peel-and-stick tiles typically last 5 to 10 years, depending on installation durability and maintenance tips. You can extend their lifespan by ensuring proper surface prep and avoiding excessive moisture. Regular cleaning keeps them looking fresh, but don’t expect them to outlive your patience. With proper care, they’ll stay vibrant and functional, giving your space a quick, affordable facelift.
Are There Eco-Friendly or Recyclable Peel-And-Stick Tile Options?
Yes, you can find eco-friendly peel-and-stick tiles made from sustainable materials like recycled plastics or natural fibers. Look for brands that prioritize environmentally conscious manufacturing and participate in recycling programs. These options reduce waste and your carbon footprint, making your home upgrade more sustainable. Always check product labels for eco-friendly certifications and disposal instructions to guarantee you’re making an environmentally responsible choice.

Nexus Self Adhesive 12-Inch Vinyl Floor Tiles, 20 Tiles – 12" x 12", Bianco Marble Pattern – Peel & Stick, DIY Flooring for Kitchen, Dining Room, Bedrooms & Bathrooms by Achim Home Decor
Nexus Vinyl Tiles: Refresh your home for a low cost and no hassle with the Nexus Vinyl Floor…
As an affiliate, we earn on qualifying purchases.
As an affiliate, we earn on qualifying purchases.
Conclusion
A peel-and-stick tile makeover is like giving your space a fresh coat of confidence. With just a little effort, you transform dull surfaces into eye-catching features, turning your home into a personalized masterpiece. It’s a quick, budget-friendly way to breathe new life into any room—no tools or mess required. So go ahead, stick to your vision, and watch your home shine brighter than ever. Your space is now a canvas waiting for your creative touch!

Art3d Smoothing Tool Kit for Applying Peel and Stick Wallpaper, Vinyl Backsplash Tile
【Set of basic tools】: Package includes craft art knife with 5 replaceable blades, red smoother, blue smoother with…
As an affiliate, we earn on qualifying purchases.
As an affiliate, we earn on qualifying purchases.

STICKGOO 10-Sheet Peel and Stick Subway Tile, Stick on Tiles Backsplash for Kitchen & Bathroom in White (Thicker Design)
2-3 Times Thickness: Each tile is 2mm-2.5mm thick, offering durability and solidity, providing a high-quality alternative to soft…
As an affiliate, we earn on qualifying purchases.
As an affiliate, we earn on qualifying purchases.